

- Your initial (This one is made out of cardboard. I purchased it from Jo Ann's)
- Glue (I used Elmer's Craft Tacky glue)
- Accent paint (I used a seafoam green. If you want it to look more antiqued you can use black)
- Marker (to make your scroll pattern)
- Here is where you have a choice:
- Aluminum foil (I used foil with Mod Podge for this project but if I had it to do over again I'd go with the second choice!)
- OR you can use your choice of spray paint. The foil has a nice effect, but is REALLY hard to work with. I'll include directions for how to do it for those of you that are DYING to use foil instead of spray paint :)
Find a scroll pattern that you like and draw it onto the letter with your marker. I went online and googled "scroll pattern" and found one that was fairly easy to draw. I don't have a pick of this step, but you'll see my pattern in the next step.
Step two:
Using your glue, you will draw your scroll pattern. Be careful to lay the letter on a flat surface so that the glue doesn't drip. The glue dries like puff paint to give you the raised pattern. I outlined mine twice so that it stood out really nicely.

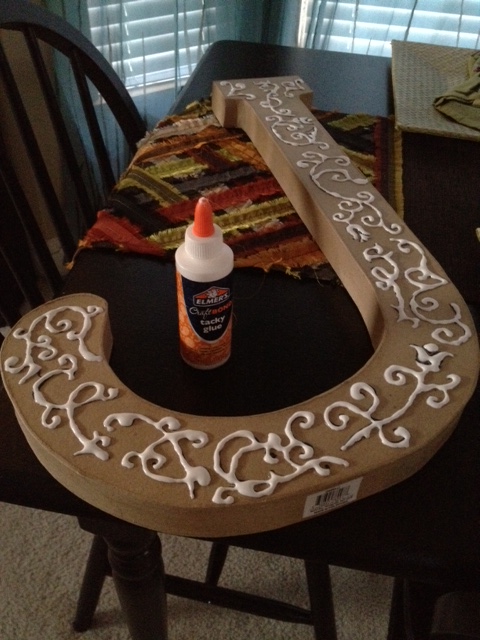

Here is how it looks once the glue has dried.
If you've chosen to use spray paint, you'll simply take your letter outside and spray paint it! Be sure to pick a spray paint that will adhere to non-pourous surfaces. It will lay better on the glue. Once the spray paint has dried you can skip to step 4.
Step 3 (foil method)
I tried this several different ways and the easiest way I found to do this is to start out with the sides of the letter. You can cut strips of foil and use mod podge to glue them to your letter. It is much easier to use medium size strips (so that the foil doesn't crumple or tear) but you have to be willing to live with the seams showing. I found that it made it look more like a metal letter. Once your sides are dried on (you can wipe off any wet Mod Podge that got onto the top of the foil with a wet rag... don't wait until it dries to try to wipe it off!) you can trace your letter onto aluminum foil to cover the top. This was hard because you're dealing with a bigger piece of foil, but I didn't want any seams on the top of my letter. Cut the letter out of foil, spread mod podge onto the letter and line up the foil to paste it on. Once you have it placed, you can either use your fingers or a q-tip to press the foil around your scroll pattern to really make it POP!

Here is a pic from my first go-round when I decided that I could just cut the foil once i had it glued... I don't recommend that method... my foil tore all over the place. I definitely recommend cutting out the letter before you glue the foil on, but I didn't have a pic of that so... you get the gist:

Step 4:Use a sponge brush to brush on your choice of paint and use a dry paper towel to wipe off the excess. You can play around with this a bit to get the exact amount of pain that you want.
And viola! You have a beautiful initial! You can use this for so many different things. You can hang it on your wall, use it as a door wreath (just add some embellishments and some ribbon to the top to hang it with), attach long ribbons to the bottom for a little girl's bow holder... you get the idea!
Happy Krafting!!! Oh.. and yes, I know that crafting is with a C... I'm just keeping with the Kristy with a K theme. Thanks for looking!